
warning: espcomm_send_command: didn't receive command response
warning: espcomm_send_command(FLASH_DOWNLOAD_BEGIN) failed
error: espcomm_upload_mem failed
After searching for a reference to the web, finally got the solution.
Hopefully this article can help you if you have the same problem.
NodeMCU IOT is an open source platform that incorporate firmware which runs on top of ESP8266 Wi-Fi SoC.

Figure 1. NodeMCU Board

Figure 2. NodeMCU Board Bottom
Steps:
1. Plug Board NodeMCU on a breadboard

Figure 3. NodeMCU plugged in on breadboard
2. Install CP2102 (USB to Serial Converter) driver in accordance with the OS can be downloaded.
3. Record the port number, for example COM4


Gambar 4. Port setelah instalasi driver USB CP2102
3. Install Arduino IDE (Sketch) can be downloaded.
4. Install esp8266 boards manager
4.a. File -> References
4.b. Paste the following URL to the Additional Board Manager option
http://arduino.esp8266.com/stable/package_esp8266com_index.json

Gambar 5. Isian pada Preferences
4.c. Tools -> Board ..., choose Boards manager.
4.d. Scroll down, and choose esp8266 by ESP8266, and click on install.


Figure 6. Once the boards manager are installed
5. Set the right Board & Port
5.a. Tools -> Board ..., chose NodeMCU 1.0 (ESP 12E module) from list.
5.b. Tools-> Port, select COM4 (according to step 3 above)
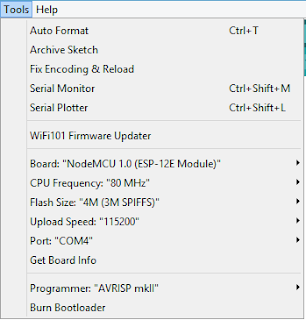
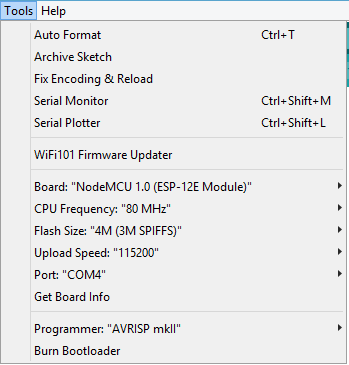
Gambar 7. Parameter after setting
6. Plug a led on breadboard where the anode leg on pin D7, and cathoda on GND as shown below

Gambar 8. Plug a Led on pin D7 and GND
void setup() {
pinMode(D7, OUTPUT);
}
void loop() {
digitalWrite(D7, HIGH); // turn the LED on (HIGH is the voltage level)
delay(1000); // wait for a second
digitalWrite(D7, LOW); // turn the LED off by making the voltage LOW
delay(1000); // wait for a second
}
pinMode(D7, OUTPUT);
}
void loop() {
digitalWrite(D7, HIGH); // turn the LED on (HIGH is the voltage level)
delay(1000); // wait for a second
digitalWrite(D7, LOW); // turn the LED off by making the voltage LOW
delay(1000); // wait for a second
}
8. Verify your code
9. Upload your code


Gambar 9. Upload succeed
If you do it right, then the LED will blink.
10. If failed
Trouble Shooting:
When upload you got this error message:
warning: espcomm_send_command: didn't receive command response
warning: espcomm_send_command(FLASH_DOWNLOAD_BEGIN) failed
error: espcomm_upload_mem failed
For more specified you can activate verbose mode (File-> Preference, and checkedon Show verbose output during (x) compilation (x) upload).
warning: espcomm_send_command(FLASH_DOWNLOAD_BEGIN) failed
error: espcomm_upload_mem failed
For more specified you can activate verbose mode (File-> Preference, and checkedon Show verbose output during (x) compilation (x) upload).
Solution:
The error can be caused by something prevent the board entered the programming/flash mode, to enabled the programming/flash mode pull up pin D3 (GPIO 0) to GND

Gambar 10. Pull pin D3 (GPIO 0) to GND
and try to upload again (verbose log when succeed).
Sketch uses 230,113 bytes (22%) of program storage space. Maximum is 1,044,464 bytes.
Global variables use 32,368 bytes (39%) of dynamic memory, leaving 49,552 bytes for local variables. Maximum is 81,920 bytes.
C:\Users\hendra-new\AppData\Local\Arduino15\packages\esp8266\tools\esptool\0.4.9/esptool.exe -vv -cd nodemcu -cb 115200 -cp COM4 -ca 0x00000 -cf C:\Users\HENDRA~1\AppData\Local\Temp\arduino_build_696037/nodeMCUhelloworld.ino.bin
esptool v0.4.9 - (c) 2014 Ch. Klippel <ck@atelier-klippel.de>
setting board to nodemcu
setting baudrate from 115200 to 115200
setting port from COM1 to COM4
setting address from 0x00000000 to 0x00000000
espcomm_upload_file
espcomm_upload_mem
setting serial port timeouts to 1000 ms
opening bootloader
resetting board
trying to connect
flush start
setting serial port timeouts to 1 ms
setting serial port timeouts to 1000 ms
flush complete
espcomm_send_command: sending command header
espcomm_send_command: sending command payload
read 0, requested 1
trying to connect
flush start
setting serial port timeouts to 1 ms
setting serial port timeouts to 1000 ms
flush complete
espcomm_send_command: sending command header
espcomm_send_command: sending command payload
espcomm_send_command: receiving 2 bytes of data
espcomm_send_command: receiving 2 bytes of data
espcomm_send_command: receiving 2 bytes of data
espcomm_send_command: receiving 2 bytes of data
espcomm_send_command: receiving 2 bytes of data
espcomm_send_command: receiving 2 bytes of data
espcomm_send_command: receiving 2 bytes of data
espcomm_send_command: receiving 2 bytes of data
Uploading 234256 bytes from C:\Users\HENDRA~1\AppData\Local\Temp\arduino_build_696037/nodeMCUhelloworld.ino.bin to flash at 0x00000000
erasing flash
size: 039310 address: 000000
first_sector_index: 0
total_sector_count: 58
head_sector_count: 16
adjusted_sector_count: 42
erase_size: 02a000
espcomm_send_command: sending command header
espcomm_send_command: sending command payload
setting serial port timeouts to 15000 ms
setting serial port timeouts to 1000 ms
espcomm_send_command: receiving 2 bytes of data
writing flash
................................................................................ [ 34% ]
................................................................................ [ 69% ]
..................................................................... [ 100% ]
starting app without reboot
espcomm_send_command: sending command header
espcomm_send_command: sending command payload
espcomm_send_command: receiving 2 bytes of data
closing bootloader
flush start
setting serial port timeouts to 1 ms
setting serial port timeouts to 1000 ms
flush complete
Finally let's try, and good luck.
Regards,
Hendra.
Tidak ada komentar:
Posting Komentar